Wednesday, December 31, 2008

6 Digits 7-Segment LED Multiplexing using a Shift Register

Multiplexing technique can reduce number of needed I/O pins of the MCU as I have explained in 'LED 7-Segment Multiplexing' and '6 Digits LED 7-Segment Multiplexing'. In those posts, I used 13 I/O pins for driving 6 digits LED 7-Segment. However, the PIC16F627A and PIC16F628 have only 15 usable I/O pins that include 2 pins for external 32.768KHz oscillator. So, there is no pin left for time setting buttons. I can change to the PIC that has more I/O pins, but I don't think it's a good solution. From my searches, I can overcome this I/O pins shortage problem by using shift register to expand the MCU I/O pins.

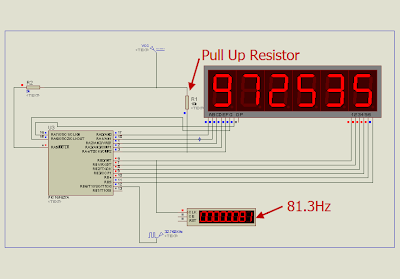
The concept is very similar to led dot matrix driving technique. Each digit is multiplexed via a shift register 74HC595 which is required 3 pins of the MCU. Each segment of the 7-segment display is driven by PORTA of the PIC16F628. As a result, the required pins for driving 6-Digit 7-Segment display are just 3+7 = 10 pins!. With this configuration, there are 3 I/O pins that are free for time setting buttons and driving blinking second LEDs.

I use TMR2 module for scanning digits. TMR2 is an 8-bit timer which overflows every 256 (0xFF) counts. It's known that the refresh rate above 50Hz would be enough for human's eyes to see the display without recognizing the flickering. If I set TMR2 with 1:8 Prescaler (T2CON = 0x3C), the multiplexing frequency will be 81.3Hz (4MHz/4/256/8/6 = 81.3Hz) which is enough for flicker free display.

PORTA is used to drive each segment of the 7-segment displays. However, I have to skip the RA5 as it's a MCLR pin and it can be only input pin. So, my 7-segment digit mask is different then the normal 7-segment digit mask.

my PORTA 7-segment digit mask : {0x5F, 0x06, 0x9b, 0x8f, 0xC6, 0xCd,0xDD, 0x07,
0xDf, 0xCf}
Normal 7-segment digit mask : {0x3f, 0x06, 0x5b, 0x4f, 0x66, 0x6d, 0x7d, 0x07, 0x7f, 0x6f} for number 0-9 respectively.


Below is the example schematic of 999999-second counter using the PIC16F627A or PIC16F628 and a shift register. I will not implement a clock with this configuration as I need more free MCU pins for driving Alarm buzzer and other things.

pic16F627a PIC16F628 74HC595 LED 7-segment multiplex

The source code for 999999-second counter in MikroC is listed below

//PIC16F627A or PIC16F628
//4MHz Internal OSC
//MUX by using Shift Register 595
// Critical parameters:
// Delay, Postscaler, Prescaler
// Low delay + High Prescaler
// 03/11/2008
// punkky@gmail.com
#define SH_CP PORTB.F0
#define DS PORTB.F1
#define ST_CP PORTB.F2
// 7-Segment code is skipping RA5, so the code is not as normal 7-segment coding
unsigned short number [10] = {
    0x5F0x060x9b0x8f0xC60xCd, 0xDD0x07,
    0xDf, 0xCf
};
unsigned short digit [6] = {
    000000
};
unsigned short i;
unsigned short n;
unsigned short counter;
unsigned short tick;
unsigned short shift_register;
unsigned short x1;
unsigned short x2;
unsigned short x3;
unsigned short x4;
unsigned short x5;
unsigned short x6;
void interrupt ()
{
    if (PIR1.TMR2IF)
    {
        PIR1.TMR2IF = 0;
        if (counter == 5)
        {
            //Shift data
            DS = 0;
            //Store data
            SH_CP = 1;
            SH_CP = 0;
            Delay_us (250);
            counter = 0;
        }else
        {
            //Shift data
            DS = 1;
            //Store
            SH_CP = 1;
            SH_CP = 0;
            Delay_us (250);
            counter ++;
        }
        ST_CP = 1;
        ST_CP = 0;
        PORTA = 0x00;
        PORTA = number [digit [counter]];
    }
    if (PIR1.TMR1IF)
    {
        TMR1H = 0x80;
        PIR1.TMR1IF = 0;
        tick = 1;
        x6 ++;
        if (x6 > 9)
        {
            x6 = 0;
            x5 ++;
            if (x5 > 9)
            {
                x5 = 0;
                x4 ++;
                if (x4 > 9)
                {
                    x4 = 0;
                    x3 ++;
                    if (x3 > 9)
                    {
                        x3 = 0;
                        x2 ++;
                        if (x2 > 9)
                        {
                            x2 = 0;
                            x1 ++;
                            if (x1 > 9)
                            {
                                x1 = 0;
                            }
                        }
                    }
                }
            }
        }
    }
}
void main ()
{
    //Digital I/O for PORTA
    CMCON = 0x07;
    TRISA = 0x00;
    PORTA = 0x00;
    TRISB = 0x00;
    PORTB = 0x00;
    //Internal Clock 4MHz
    PCON.OSCF = 1;
    counter = 0;
    // Set GIE, PEIE
    INTCON = 0xC0;
    //1:8 post scaler
    T2CON = 0x3C;
    // enable interupt
    PIE1.TMR2IE = 1;
    T1CON = 0x0F;
    //Initial value TMR1: 0x8000
    TMR1H = 0x80;
    TMR1L = 0x00;
    // enable interupt
    PIE1.TMR1IE = 1;
    //Data
    DS = 0;
    //Store
    SH_CP = 0;
    ST_CP = 0;
    x1 = 0;
    x2 = 0;
    x3 = 0 ;
    x4 = 0;
    x5 = 0;
    x6 = 0;
    while (1)
    {
        if (tick)
        {
            tick = 0;
            digit [0] = x1;
            digit [1] = x2;
            digit [2] = x3;
            digit [3] = x4;
            digit [4] = x5;
            digit [5] = x6;
        }
    }
}

Saturday, December 27, 2008

Trojan Attack : Trojan.vundo

In last couple days, I have been getting headache with Trojan attack on my computer. The symptoms were a lot of Antispyware 2009 ads and other annoying popups (Browser Hijack). I started the task manager and found that iexplore.exe was running even I didn't use IE. I found some strange files in windows/system32 such as

- sakalimo.dll
- fodituva.dll
- yidaziwi.dll
- dobafigi.dll
- juvilisi.dll
- igifabod.ini
- vefiyohu.dll
- gujayiwo.dll
- titubeve.dll

I tried Trojan Hunter, NOD32 and Spybot Search&Destroy. They found some Trojans & Malwares but they could not kill the annoying popups. After some searches, I have found that I got attack from Trojan.vundo and Trojan.vundo.H . And from my searches, I found only one mulware/trojan removal program, Malwarebytes' Anti-Mulware or MBAM, from http://www.malwarebytes.org/ that can remove these Trojans.

Malwarebytes' Anti-Mulware
It's FREE! I installed it and did full system scan. It took about 3 hours for my system scan. As expected, it found and removed a lot of Trojan.vundo from my machine. After cleaning those Trojans, my machine is running fine and consuming less RAM than before.

Sunday, December 21, 2008

6 Digits LED 7-Segment Multiplexing

In the post 'LED 7-Segment Multiplexing', I have explained about the concept and benefits of multiplexing. Multiplexing implementation is very similar to driving Led Dot Matrix. I use Timer0 interrupt for switching through each digit. Timer0 or TMR0 is an 8-bit timer which overflows every 256 (0xFF) counts. It's known that the refresh rate above 50Hz would be enough for human's eyes to see the display without recognizing the flickering. If I set TMR0 with 1:8 Prescaler, the multiplexing frequency will be

4MHz(internal OSC.)/4(working OSC)/8(prescaler)/256(max counts of TMR0)/6(number of digits) = 81.3 Hz which is good for a display.

Just an example, I have implemented (in Proteus) a 999999-second counter by using 6 Digits LED 7-Segment Multiplexing technique. There are 2 main components in the project, PIC16F627A or PIC16F628 and 6 x LED7-segment display. The schematic shows below. The crystal is 32.768KHz as usual. There is a 10KOhm pull up resistor at RA4 pin as this pin is an open-drain pin as I described in "Open-Drain RA4 pin on PIC Microcontroller".

7-Segment LED Multiplexing PIC16F627A or PIC16F628
The source code in MikroC is listed below: (.hex is also available, please feel free to contact me)
//PIC16F627A
//4MHz Internal OSC
//MUX by the MUC itself with Interrupt
//TMR0 .. check the prescelar+delay in scan routine as they are related
//punkky@gmail.com
unsigned short number [10] = {
    0x5F0x060x9b0x8f0xC60xCd, 0xDD0x07,
    0xDf, 0xCf
};
unsigned short digit [6];
unsigned short counter;
unsigned short shift_register;
unsigned short x1;
unsigned short x2;
unsigned short x3;
unsigned short x4;
unsigned short x5;
unsigned short x6;
unsigned short tick;
void interrupt ()
{
    if (INTCON.T0IF)
    {
        //Scan digits with TMR0
        INTCON.T0IF = 0;
        if (counter == 5)
        {
            PORTA = number [digit [counter]];
            Delay_us (500);
            shift_register = 0x01;
            PORTB = ~shift_register;
            PORTA = 0x00;
            counter = 0;
        } else
        {
            PORTA = number [digit [counter]];
            Delay_us (500);
            shift_register = shift_register << 1;
            PORTB = ~shift_register;
            PORTA = 0x00;
            counter ++;
        }
    }
    if (PIR1.TMR1IF)
    {
        TMR1H = 0x80;
        PIR1.TMR1IF = 0;
        tick = 1;
        //update current time
        x6 ++;
        if (x6 > 9)
        {
            x6 = 0;
            x5 ++;
            if (x5 > 9)
            {
                x5 = 0;
                x4 ++;
                if (x4 > 9)
                {
                    x4 = 0;
                    x3 ++;
                    if (x3 > 9)
                    {
                        x3 = 0;
                        x2 ++;
                        if (x2 > 9)
                        {
                            x2 = 0;
                            x1 ++;
                            if (x1 > 9)
                            {
                                x1 = 0;
                            }
                        }
                    }
                }
            }
        }
    }
}
void main ()
{
    //Digital I/O for PORTA
    CMCON = 0x07;
    TRISA = 0x00;
    PORTA = 0x00;
    TRISB = 0x00;
    PORTB = 0x00;
    //Internal Clock 4MHz
    PCON.OSCF = 1;
    counter = 0;
    // Enable TMR0
    OPTION_REG.T0CS = 0;
    // Enable Prescaler
    OPTION_REG.PSA = 0;
    // PS0,1,2 = 010 = 3
    // 3 means 1:8 prescaler
    // 1:2, 1:4, 1:8, 1:16, 1:32, 1:64, 1:128, 1:256
    OPTION_REG.PS2 = 0;
    OPTION_REG.PS1 = 1;
    OPTION_REG.PS0 = 0;
    INTCON.T0IF = 0;
    INTCON.T0IE = 1;
    INTCON.GIE = 1;
    INTCON.PEIE = 1;
    T1CON = 0x0F;
    TMR1H = 0x80;
    TMR1L = 0x00;
    // Enable TMR1 interrupt
    PIE1.TMR1IE = 1;
    shift_register = 0x01;
    x1 = 0;
    x2 = 0;
    x3 = 0;
    x4 = 0;
    x5 = 0;
    x6 = 0;
    while (1)
    {
        if (tick)
        {
            tick = 0;
            //update digits
            digit [0] = x1;
            digit [1] = x2;
            digit [2] = x3;
            digit [3] = x4;
            digit [4] = x5;
            digit [5] = x6;
        }
    }
}

Saturday, December 20, 2008

Frequency Divider

I am always looking for perfect frequency oscillator for a given budget for my clock projects. Searching on eBay provided a lot of good frequency oscillators including OCXO (Oven Controlled Crystal Oscillator) and Rubidium Frequency Oscillator. Most of them are for telecommunication systems and audio systems. But, I want to use the oscillator just for making a good clock. Yes, just a real clock for telling time.Those oscillators on eBay provide frequencies that not suitable for making a clock. For example, 10MHz,11.2896, MHz, 16.9344MHz etc.,

There are some techniques to make use of these oscillators in clock projects. I have post a solution for 11.2896MHz in "Using 11.2896 MHz with TMR1 (timer1 module)".

For 10MHz oscillator, I will use ripple counters as the frequency divider to divide the 10MHz to lower frequency and use it as a time reference for my clocks. I got information about 10MHz frequency division from Seiichi Inoue's website. From the web, 10MHz frequency can be divided by using 3 pcs. of Dual Decade Counter (74390 or 74HC390). By using the schematic below, I can get 100Hz from 10MHz input. By feeding 100Hz to PIC Microcontroller with appropriate firmware I will get a good accuracy clock.
10MHz Frequency DividerIt's not so easy to divide 16.9344MHz to appropriate frequency for my clocks. However, I will try to figure it out and post it here.

Saturday, December 6, 2008

Digital Clock without Microcontroller

Digital Clock Big Digit I have found a digital clock that uses just a clock chip without microcontroller from Electronickits.com . The picture above is the Digital Clock With 24 Hour Timer made by Canakit.com . It uses LM8560 clock chip which incorporates a wide range of features such as alarm, snooze, and 24 hour timer. The digit height is 50mm and made of 87 discrete LEDs. It can be a unique wall clock by just cover the digits with red Plexiglas and hang it on the wall.

Thursday, December 4, 2008

.htacess needs UTF-8 encoding

Yesterday, I was setting up a Wordpress Mu site and getting only "500 Internal Error". I checked web server log file and found a lot of errors like below

[Wed Dec 3 19:29:38 2008] [alert] [client xxx.xxx.37.222] /home/punkky/public_html/.htaccess: Invalid command '\xef\xbb\xbfRewriteEngine', perhaps mis-spelled or defined by a module not included in the server configuration


Firstly, I thought that the rewrite_mod might not be installed on the server. But it's not the case. Finally, I have found that \xef\xbb\xbfRewriteEngine was the source of problem. It means .htaccess has wrong encoding. I opened .htaccess in Notepad and saved it with 'UTF-8' encoding. The problem is solved!. Now the site is up and running.

Tuesday, December 2, 2008

LED 7-Segment Multiplexing

In my first Digital Clock, I use 6 pcs. of CD4543,BCD to 7-Segment decoder, to drive 6 digit LED 7-Segment display for the sake of simplicity of the software. However, the hardware needs many components. As you can see in the post, the PCB of the clock is quite big and containing a lot of solder points. To reduce the number of components, I will integrate the function of CD4543 into the firmware. One digit requires 7 connections (wires) for all segments and 1 connection for common cathode (or anode). If I connect 6 digits to the MCU without any modification, I will need 7-segment x 6 digit = 42 connections . That means I need to use MCU with atleast 42 I/O pins. As you know, it is a waste for using a lot of MCU pins just for display. The required pins can be reduced dramatically by using a technique called Multiplexing.

Multiplexing

Multiplexing technique is based on the idea of Persistence of vision of the human eyes. The sample schematic of 3 digits multiplexing is shown below. Segment a-g of each digit are connected together. Each digit is switched on-off by controlling signal at Digit 1, Digit 2 and Digit 3. For example, if Digit 1 is '1' , Digit 1 will be on. If Digit 1 is '0', Digit 1 will be off. People will see all 3 digits display in the same time if each digit switch on and off fast enough.


Led 7-Segment multiplexing
By using multiplexing technique the number of required connections for 6 digits display is reduced from 42 pins to 7-Segment+6 digits = 13 pins Wow!! I can drive 6 digits 7-segment display by using just a PIC16F627A.
Next time, I will post the program for LED 7-Segment Multiplexing

--- Updated 21 Dec 2008 --
The program for LED 7-Segment Multiplexing is now posted at 6 Digits LED 7-Segment Multiplexing